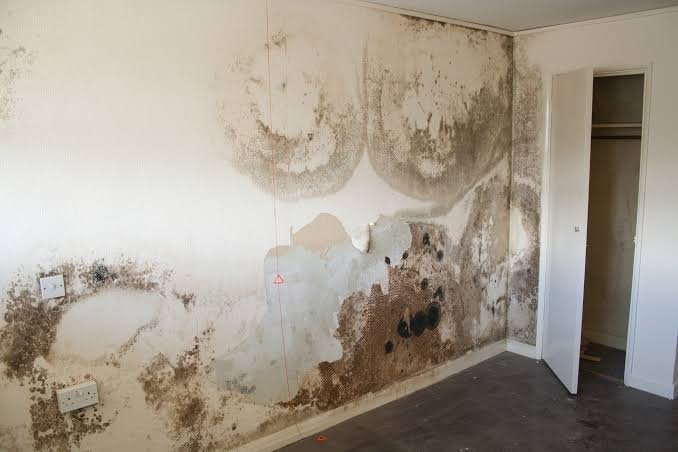
You’ve probably stood in front of that wall more than once. The one with the faint yellowish patch near the ceiling, or the corner that always looks a little “off” no matter how many times you’ve painted over it. You paint over damp walls thinking it’s fixed, and three months later, the stain is back, grinning at you like it never left.
Here’s the thing — most people get this wrong not because they’re careless, but because painting over damp walls isn’t really a painting problem first. It’s a moisture problem that painting comes in to finish off. Get the order wrong, and you’ll be back here again by monsoon.
This guide walks through how to actually paint over damp walls so the fix holds — not just for a season, but for years.
Why Paint Over Damp Walls Fails So Often
Painting over damp walls without addressing the water source is the single biggest reason repaint jobs fail within months. The paint film traps moisture underneath, and it eventually pushes back through as blistering, flaking, or the same old stain.
I’ve seen this happen in my own house, actually. We repainted a bedroom wall right before Diwali one year — looked lovely for about six weeks. Then the patch crept back, slightly bigger than before. Turned out a bathroom pipe on the other side had been leaking slowly the whole time. No amount of paint was ever going to fix that.
A few common causes worth knowing:
- Leaking pipes or plumbing joints hidden inside walls
- Rising damp from the ground floor (common in older buildings)
- Poor waterproofing on terraces or exterior walls, especially before monsoon
- Condensation in poorly ventilated bathrooms or kitchens
- Cracked external plaster letting rain seep in over years
Skip the diagnosis, and you’re just painting over a problem that’s still very much alive behind the surface.
Step 1: Find and Fix the Source of Moisture First
No paint product, however expensive, will permanently hide dampness if water is still getting in. This step isn’t optional, and it’s the one most people try to skip.
Start by checking the obvious culprits — bathroom walls that back onto bedrooms, terrace slabs above stained ceilings, and any wall facing outward that catches direct rain. If you’re not sure where the water’s coming from, a plumber or a waterproofing contractor can usually trace it within an hour or two using simple moisture meters.
For external walls, this often means:
- Re-doing the waterproofing on the terrace or exposed ledges
- Sealing hairline cracks in the exterior plaster
- Checking window sills and AC pipe holes for gaps (a surprisingly common leak point)
For internal dampness, it’s usually plumbing. Get that fixed before you touch a paintbrush. Genuinely — wait at least 2-3 weeks after the leak repair for the wall to dry out properly before moving to the next step.
Step 2: Let the Wall Dry Completely
Painting over damp walls before they’ve fully dried is asking for trouble — the paint will seal moisture in rather than let it escape.
Rushing this step is honestly the most common mistake I see, even among people who did fix the leak properly. A wall that looks dry on the surface can still be holding moisture a few millimetres in. If you have access to a moisture meter, aim for a reading under 16% before painting. If not, a simple trick: tape a small piece of clear plastic sheet to the wall and leave it overnight. Condensation on the inside of the sheet means the wall’s still wet.
Depending on the climate and how bad the damage was, drying can take anywhere from a few days to a couple of weeks. Jaipur’s dry heat actually helps here compared to, say, Mumbai or Kochi, where humidity slows things down considerably.
Step 3: Scrape Off Loose Paint and Flaking Plaster
Don’t paint over flaking or bubbling surfaces — it never holds. Scrape everything loose away with a paint scraper or wire brush until you hit solid, sound plaster. If the plaster itself is crumbling, you’ll need to redo that patch before moving forward.
This part is unglamorous work, and a little tiring on the arms if the patch is large. But painting over a loose surface just means you’ll be doing this whole exercise again in a year.
Step 4: Treat the Stain Before Priming
Even after the wall’s dry, the old stain can bleed right through fresh paint — tannins and salts in the damaged plaster have a way of resurfacing.
Answer: To stop stains bleeding through, apply a stain-blocking primer (oil-based or shellac-based) directly on the affected patch before the regular primer. This seals the discolouration so it can’t travel up through your topcoat.
Popular options in India include Asian Paints Damp Proof, Berger WeatherCoat Anti Rust, and Dulux’s stain-block primers — all reasonably easy to find at local hardware stores. Apply two coats if the stain is dark or old.
Step 5: Apply a Waterproofing or Damp-Proof Primer
This is different from the stain-blocker — think of it as the wall’s raincoat. Paint over damp walls confidently once this layer is on, because it stops any residual moisture in the plaster from pushing through later.
Look for primers labelled specifically for “damp-proofing” or “waterproofing,” not just general-purpose ones. A litre typically covers 100-120 sq. ft. and costs somewhere between ₹250-₹450 depending on the brand — worth every rupee compared to redoing the job.
Step 6: Choose the Right Topcoat Paint
Not all paints handle moisture equally well. For rooms prone to dampness — bathrooms, kitchens, ground-floor rooms — go with:
- Exterior-grade emulsions for outward-facing walls, even indoors if the wall backs onto an exterior surface
- Anti-fungal or anti-algal formulations for humid areas
- Semi-gloss or satin finishes, which resist moisture better than flat matte
Matte finishes look lovely, I know, but they’re genuinely more porous. In a damp-prone room, that’s a trade-off you don’t want to make just for the look.
[link to related guide on best waterproof paints for Indian homes here]
Step 7: Apply Paint in the Right Weather and Conditions
Humidity above 70% or temperatures below 10°C will mess with how paint cures, even indoors. Try to paint on a dry day, with windows open for ventilation, and avoid painting right before rain is expected if you’re doing exterior walls.
Has this ever happened to you — freshly painted wall, and then unseasonal rain the same evening? It’s more common than you’d think, especially with how unpredictable pre-monsoon weather has gotten in the last few years.
Step 8: Maintain Ventilation After Painting
Once the paint’s on, keep the room ventilated for a few days. Damp walls often come back because the room itself stays humid — not because the paint job was bad. Exhaust fans in bathrooms and kitchens genuinely make a difference here, more than people give them credit for.
[link to related guide on bathroom ventilation and mould prevention here]
Common Mistakes to Avoid
- Painting over a wall that “looks” dry without actually testing it
- Skipping the stain-blocking primer because “regular primer should be fine” (it usually isn’t)
- Using interior matte paint in a bathroom or kitchen
- Ignoring the actual leak source and just repainting every year
- Rushing the drying period because guests are coming over — this one’s tempting, and I get it, but it rarely ends well
[link to related guide on choosing paint finishes for humid rooms here]
FAQ: Painting Over Damp Walls
Can I paint over a damp wall without fixing the leak? You can, but it won’t last. The stain will almost always come back within a few months, sometimes worse than before, because the moisture is still trapped behind the new paint layer.
How long should I wait before painting after a leak is fixed? Give it at least 2-3 weeks in most Indian climates, longer in humid coastal cities. The wall needs to dry out fully, not just look dry on the surface.
What’s the best primer for damp walls in India? A shellac or oil-based stain-blocking primer works best for sealing old stains, followed by a dedicated damp-proof or waterproofing primer before the topcoat.
Does emulsion paint work on damp-prone walls? Yes, but choose exterior-grade or anti-fungal emulsion rather than a standard interior one, especially for bathroom-adjacent or ground-floor walls.
Why does the stain keep coming back even after repainting? This almost always means the underlying moisture source hasn’t been fixed, or a proper stain-blocking primer wasn’t used before the topcoat.
Is it necessary to hire a professional for this? For small patches, a careful DIY approach works fine. For larger areas, rising damp, or when you can’t locate the source of moisture, it’s worth getting a waterproofing contractor to have a look before you spend on paint.
Conclusion
Painting over damp walls isn’t really about the paint at all — it’s about everything you do before you open the tin. Find the source, let the wall dry properly, treat the stain, and use the right primers and topcoat for the room. Skip any one of these steps, and you’re just buying yourself a few months before the patch reappears.
If you’re dealing with a stubborn damp patch that keeps returning no matter what you try, it might be time to get a waterproofing professional to check for a hidden leak before you pick up a paintbrush again.